Customizing a gesture recognition model with MediaPipe

MediaPipe1 is an amazing library of ready-to-use deep learning models for common tasks in various domains. My previous post highlights how you can use it to easily detect facial landmarks. There are many other solutions available to explore. In this post however, I want to take a look at another feature, the MediaPipe Model Maker. Model maker allows you to extend the functionality of some MediaPipe solutions by customizing models to your specific use case. With only a few lines of code, you can fine tune models and rewire the internals to accommodate new targets.
In this particular example, we will customize the hand gesture recognition task to build a model for reading the American Sign Language (ASL) fingerspelling alphabet. We are going to learn how a basic solution can be created with small effort. But we will also see that there are limitations to the (current) functionality of the MediaPipe Model Maker.

TL;DR
Here is a quick overview of the required steps to customize the gesture recognition task for a new problem. The approach is the same for the more general image classification task.
- Get or create some data. Image files for each class must be provided in a separate sub folder. The folder names are used as class labels.
- Preprocess images by calling
Dataset.from_folder - Set hyper-parameters with
HParamsandModelOptions. - Fine tune the model with
GestureRecognizer.create. - Evaluate performance with
model.evaluate. - Export the model with
model.export_model.
Beyond the basic steps, we are going to take a look at the hand gesture embeddings, which MediaPipe uses under the hood and we will also perform a more thorough evaluation of the model’s accuracy.
Prerequisites
Before getting started with the main code, we need take care of some external resources. First, the Model Maker does not come with the default MediaPipe installation, so we need to install it separately. Next, we also need to get some data to train the ASL alphabet detector. MediaPipe will work directly from the files on disk, so some minor preprocessing on the dataset is also needed.
Installing MediaPipe Model Maker
Installing is straightforward with pip. Note that the installation might not succeed on Windows. If you are on Windows, you can use the Windows Subsystem for Linux (WSL) instead.
|
|
Getting the data
For this example, I am going to use the SigNN Character Database from Kaggle. It contains 8442 images showing 24 characters of the english alphabet. The dataset excludes J and Z, because they are differentiated from other characters through motion (see the image below the post). The dataset was originally created to build a mobile ASL alphabet translator - which basically does what I am creating in this post, only better. The dataset creators have a detailed description of their solution, so definitely check it out and star their page.
To download the dataset yourself, you need a Kaggle account (which is free). With 1.8GB it is fairly manageable. Before getting started, we will need to do some minor preprocessing, to make it work seamlessly with MediaPipe Model Maker.
Data preparation
According to the Model Maker documentation, only a small
number of training examples is required to retrain/fine tune the models.
Approximately 100 examples per class should be sufficient.
The easiest way to provide the data to the Model Maker is through a from_folder
method. It scans the given folder, interprets any subdirectory as target classes
and any containing (image) files as instances of that class.
The SigNN dataset is already provided in this format.
In addition, MediaPipe requires a "none" class for training, which should include
examples that do not show any of the target labels.
Training will not run without it.
We can create an empty folder called "none" within the training directory.
This will allow us to run the training, although it would probably be better to
provide actual negative examples.
We could start training with this dataset immediately. But data processing with the Model Maker is quite slow, so I do not want to work with the full dataset. Unfortunately, the MediaPipe interface has no straightforward way to control how much data is used. The easiest way I have found is to simply copy a the desired number of samples to a separate folder on disk. The following script, allows us to extract multiple non-overlapping subsets, including a heldout test set from the original dataset.
|
|
|
|
Customizing the gesture recognition task
With all the requirements installed and the data finalized in the necessary format, we can now tackle the fine tuning process with MediaPipe Model Maker.
Some utility functions
We can define a couple of utility functions, which make the code easier to read
and avoid duplicated lines. The helper functions are gathered in a local module
named utils.py:
|
|
Visualizing the data
Before training the model, we can visualize the raw data. With the utility functions from above, this only takes a few lines.
|
|
 We can see that some images are fairly low-quality. It will be interesting to see
how well the customized model performs.
We can see that some images are fairly low-quality. It will be interesting to see
how well the customized model performs.
Ingesting the data
Following the guide provided in the documentation,
we can create a gesture_recognizer.Dataset object directly from the dataset folder.
First, we set the preprocessing parameters with the HandDataPreprocessingParams
class. This is not strictly necessary, as sensible values are used by default.
Then, we call the from_folder to initialize the dataset.
Finally, we can split the dataset into a training and a validation part.
The held-out testing data is loaded similarly.
|
|
Depending on the size of the dataset, calling from_folder can take quite some
time.
This is because some heavy processing is already applied at this point.
All images in the dataset folder are read and processed. Here, a default
hand landmarker model is applied to find hands in the images.
The landmark coordinates are then passed to an embedding module, which produces
a meaningful representation of the gesture.
We are therefore not fine tuning the model on images directly.
Rather, it learns to differentiate the embeddings obtained from each gesture.
Fine-tuning the gesture recognizer
We can set (and play with) a number of hyper-parameters for the model and the training process.
|
|
I found that increasing the batch size from 2 (default) helps a lot to improve
model performance. For this particular task, we can also get away with a slightly
higher learning rate and slower LR decay, compared to the default settings.
In the ModelOptions, we could increase the model size by adding additional
layers through the layer_widths parameter.
A bigger model could increase the performance further, I am already quite happy
with the results though.
Finally, we train the model by calling the create function.
Even on CPU, this should not take too long, as the model is
just a single Dense layer with BatchNorm, ReLU and Dropout - 3737 parameters.
|
|
export_dir directory, calling create
repeatedly will not retrain from scratch but reuse the existing
weights from the last run. When testing out different hyper-parameters, you should
rename or delete the output directory.With around 95% accuracy on the validation set, the model does a good job so far. We can also evaluate the performance on the additional testing data. It appears generalization is also good.
|
|
Exporting the customized model
We can now export the customized model. With one final line, the fine-tuned ASL alphabet detector is written to disk. It can now be used in any application using MediaPipe through the Gesture Recognition task.
|
|
Applying the customized model
Similar to the face landmarker described in the previous post, we can then load and apply the ASL recognizer through the MediaPipe Tasks API. Note that this would not necessarily have to be in Python, but could also be integrated in web or on mobile apps.
|
|
We can also use the GestureRecognizer task to visualize some test examples.
The utils.py file provides a helper function for this.
|
|
Detailed performance evaluation
Using the provided model.evaluate method, we can see that the model
generally performs quite well. Unfortunately, all we get are the global loss
and overall accuracy.
In a multiclass classification problem, it would however also be interesting to
evaluate the accuracy for each class separately.
I have not found a better way to do this more granular analysis through the Model Maker interface. Instead, I am using the exported model through MediaPipe Tasks and build a custom evaluation scheme.
To do this, I am iterating through the list of test files, reading the images and running them (one by one) through the recognizer. Without any batching, this is quite an inefficient and comparatively slow solution – but it gets the job done. The original filename, corresponding label and predicted class are stored in a Pandas data frame for further analysis.
|
|
Sometimes, the model produces an empty string as class output, even though a hand was successfully detected in the image. I am replacing these with “n/a”, for better readability.
Confusion matrix
First up, we can look at the confusion matrix. For most characters, performance is very strong, but for some characters, the sensitivity drops down to 70%.
|
|

Per-class accuracy
We can also visiualize the per-class accuracy, while taking into account whether a hand was detected or not. We find that many of the false labels come from empty predictions (~4.4%), which is not too bad compared to actually false characters (~3.1%).
|
|

Actually incorrect classifications mostly come from M, N, T, S and E. This makes intuitive sense, since these gestures are very similar with slight variations of the thumb position (see image further down).
|
|
Visualizing gesture embeddings
Last but not least, I also wanted to take a look at the underlying embeddings. You will see that even without any training, there is already quite a good separation between most classes. To extract the calculated embeddings, we can to access the Tensorflow Data pipline, which is usually handled under the hood:
|
|
The gesture embeddings have 128 dimensions, which is quite difficult to visualize. I am therefore using t-SNE2 to further reduce the dimensionality:
|
|
After embedding the embeddings (😉), we can visualize the structure within the training data.
|
|

Note that aside from coloring the plot, class labels do not influence any of the processing steps leading to this image. t-SNE is an unsupervised method, which just helps to highlight similarity between the samples. It’s not surprising that our model was able to pick up on these structures as well.
Conclusion
This post showcases how MediaPipe Model Maker can be used to quickly build a working prototype for a custom problem. All you need is a handful of data and a few lines of code. Although definitely not perfect, the solution presented here performs surprisingly well (>95% accuracy) and can work as an easily achievable baseline for further optimization.
The Model Maker’s ease of use comes at the cost of flexibility. There are only limited options for data handling and model evaluation. We had to prepare the desired amount of data beforehand on disk. After the training process, we had to process test examples one by one to obtain a more granular understanding of the model performance. Hopefully, there will be more flexibility in future releases of the framework.
All code for this post is accessible on GitHub.
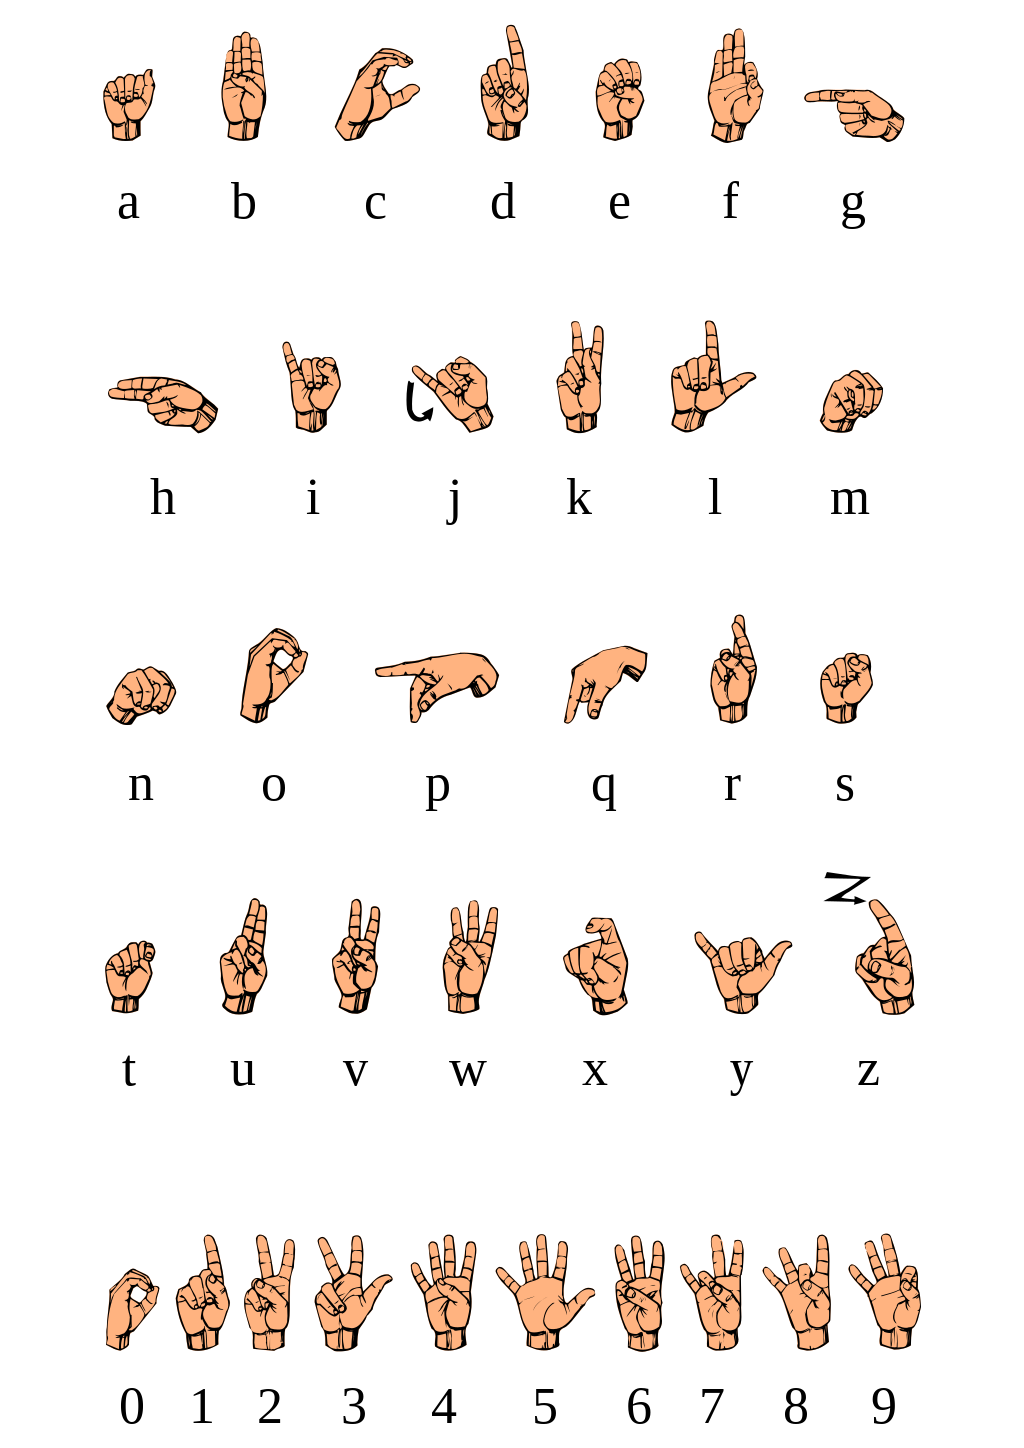
ASL fingerspelling alphabet (original)
(References)
-
C. Lugaresi et al., “MediaPipe: A Framework for Building Perception Pipelines,” 2019, arXiv:1906.08172v1. ↩︎
-
van der Maaten, L., & Hinton, G. (2008). Visualizing Data using t-SNE. Journal of Machine Learning Research, 9(86), 2579–2605. http://jmlr.org/papers/v9/vandermaaten08a.html ↩︎